Monday 12 December 2022

Strong unique passwords

strong unique password


Strategies for creating strong, unique passwords and properly managing them:

As more and more of our daily activities and personal information are being conducted and stored online, it's crucial to have strong, unique passwords for all of your online accounts. Not only do strong passwords protect your personal information from potential hackers, but they can also prevent unauthorized access to your accounts and protect your privacy.

But with so many different online accounts and passwords to remember, it can be tempting to use the same password for multiple accounts or to create passwords that are easy to remember but not very secure. This is a dangerous practice, as it puts all of your accounts at risk if one password is compromised.

Here are some tips for creating strong, unique passwords and properly managing them:

  1. Use a mix of letters, numbers, and special characters in your passwords. Avoid using dictionary words or common phrases, as these can be easily guessed or cracked by hackers using specialized software.

  2. Don't use the same password for multiple accounts. If a hacker gains access to one of your accounts, they will then have the ability to access all of your accounts if you use the same password.

  3. Consider using a password manager to help you generate and store unique, strong passwords for all of your online accounts. This can take the hassle out of remembering multiple complex passwords and help ensure that your passwords are secure.

  4. Regularly update your passwords. It's a good idea to change your passwords every few months to ensure that they remain secure.

  5. Be careful when sharing your password with others. Only share your password with trusted individuals and avoid writing it down or sharing it over unsecured channels.

By following these tips, you can help protect your personal information and online accounts from potential hackers and unauthorized access. Strong, unique passwords are an essential part of good cyber hygiene, and taking the time to create and manage them properly can help keep your online accounts and personal information secure.

How to manage passwords ? With a password manager !

Some examples of popular password managers include LastPass, Dashlane, 1Password, and Keeper. Each of these password managers offers a range of features and pricing options, so it's worth doing some research to find the one that best meets your needs. Additionally, many web browsers, such as Google Chrome and Mozilla Firefox, also offer built-in password manager features.

Friday 9 October 2020

How to secure your Linux

How to secure your linux? (easily)

Now days computer security is on the top trending topics for several reasons, the pandemic confiment also boosted the search for this topic. So you have a linux, is it secure? Most likely yes, is it vulnerable, even if daily updated (also see how to speed up apt-update ) due to default values of some configurations.

An easy way to enhance Linux security or hardening Linux? Using lynis (also works on OSX)
What's hardening?  Basically is just tunning and configuring some features that by default might allow someone to exploit or use that as a vulnerability. (not just one feature per se, but some combined might create something exploitable)

How to install lynis on Linux?

There are two instalation methods, easy and easiest. The main difference is  the version you download from the Lynis site is always the latest one where the apt-get version might take sometime to get to the lastest. 
An example is allowing access to compilers, an intruder can pass a bunch of string and in the end compile them and there you go, someone uploaded some string and created an executable on your machine. Another example is not enforcing secure password, 1234, Joe, and Password aren't exactly secure passwords, but if the system won't allow anything rather than ex: JustATinny123Pass**Again is virtual impossible to guess or crack.
 
In ubuntu/mint lynis installation (easiest):
  • sudo apt install lynis
In ubuntu/mint lynis installation (easy):
  1. Go to Lynis webpage and download the rar
  2. Unrar-It
  3. Done  

How to run Lynis on your Linux machine?

Previous Note: You should always run it as root user 
  • If the installation was done via apt-get the just type "lynis audit system" else, just go to the directory where you extracted Lynis and run "./lynis audit system".
This might take a while depending on our system ( 40sec plus). 

What do you get? Whell for start you get a score! 0-100points... if you use a default ubuntu 20 LTS from scratch you'll get around 65points depending on installed packages.

Lynis score


There's a list of issues to be solved, their solution (if possible in your system), solve one by one and in the end run it again. In the end you improve your score and harden your system.
Examples which I focus a LOT, since some of my machines are only accessible by network: sshd connections hardening.

Lynis recommendations


Thursday 8 October 2020

Remote Desktop Playing @Home

Remote Desktop Gaming

Yes codding rocks, scripts make you smile and git is the new winamp but once in a while it's nice to play a bit.

Most people now days have laptops, company laptops or personal laptops, which in general, aren't suitable for gaming nor you want to risk your working tool by overheating it. Installing games on work computers isn't also the brightest idea in the world. There's also the physical part of it, you don't want to move to your desk or across the living room to play. 

Desktop's aren't exactly portable


Alternatively you can get a gaming laptop, but those are a bit more expensive than usual, also a bit bigger and with less battery life, certainly your company won't get you one and sometimes they're a bit flashy... not ideal for a formal meeting.

Care to take it to a formal meeting?

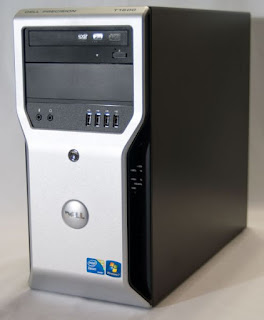
Solution: get a cheap desktop, put a GPU on it (I did it with my dell T1600 cheap homeserver) and do all the gaming on it remotely How? With a program called Parsec. The principle is very simple: 

  • Install Parsec on Desktop and laptop (or all the computers you want to interact with)
  • Create an account (FREE)
  • Login on all computers
  • Connect to one of your logged In computers
  • You're IN (literally, you're inside a remote desktop on that computer)

    parsec
    Pick one of your computers!
So you get the following: You -> Laptop -> Gaming Desktop nice

So why Parsec? Because it was developed with gaming in mind it's low latency software allows you to run games as if it was on your laptop. 

Remote Desktop

Basically it comes to this, you use a remote desktop client to play games but don't forget it's a remote desktop so it can be used for programing, for server maintenance, remotely viewing videos etc

Requirements for remote desktop gaming @home

Assuming your Desktop has a decent/recent CPU/CPU/SSD you'll pretty much run every game out there, the main requirements are just two:
  • Network speed - The higher the resolution and FPS the higher bandwith you'll need. So if possible network cable attached to the DESKTOP and pick a nice spot for your wifi-router.

Having said this, i can play with almost no lag at 1920*1080 in the same room with a 2.4Ghz 1000Gbit ISP router. 

Parsec will even show you statistics of your network performance and bottlenecks.

parsec


Dell T1600 cheap home server

My home server needs

All the stuff on the laptop is great, but sometimes I need something with a little bit more power (not Dual core but Quad-Core and more RAM), also I'd like to have something always running and available (dockers for example) and that's not doable with laptops.  

So my requirements would be quad-core, expansible RAM up to 32gb, GPU expandable, SILENT, CHEAP, and CHEAP. After some time browsing the net I've found a Dell T1600 for 50$ !!!

Dell T1600 home server specs

So for 50$ (plus shipping) what does one get? E3-1225 CPU (quad-core 4threads and GPU integrated), 4GB Ram (1066Mhz Dual Channel), GPU NVIDIA Quadro2000, PUS 320W 90%Power Efficient, 500GB HDD and a not so pretty chassis (but will be hidden so no issue here).
The CPU and Chassis fan (on the back below the PSU) are very quite by default so at present time no need to change them.
dell t1600
T1600 chassis

dell t1600
2 HDD Bays ready to get SSD on it!

Upgrades to T1600

What stays what goes and what to enhance? 
  • Clean it properly, blow out all the dust, clean the fans
  • CD-ROM disconnected, don't need it, less noise, less stuff, SATA and power cables out, yet it's still there until I get front bay cover. (if ever!)
  • 500GB HDD Swap for an SSD, my pick was a 480GB lower brand SSD laying around, had to get a 3.5 to 2.5 cage converter to fit the blue brackets.
  • Change thermal paste! This is critical, don't know for how long (if ever!) the thermal compound has been changed and this is a 95w CPU so it will get HOT. Used the Grizzly  Kryonaut.
  • The NVIDIA Quadro 2000 is OK, but for projects which use CPU/CUDA cores (and maybe some light gaming) swapped it for an MSI AERO TI 1050 . This GPU is small form designed for ITX, not that's needed, and will get all the power from the PCI-E slot. Notice dell T1600 PSU DOES NOT HAVE GPU connector. Also this new GPU has HDMI output which is a lot easier to use than caring and using DVI adapters.
  • RAM 2*2gb 1066Mhz, used some dimms from friends and got it 2*2 + 4*4  (1333Mhz)= 12gb in dual channel. Still at 1066 which will change soon to 1333Mhz on all the dimms

To do Upgrades to Dell T1600 

  • RAM from 12gb to 16gb or 24 or 32 all 1333Mhz. Specs say 16gb RAM tops but has been proved that it will take up to 32gb ram
  • Upgrade CPU to 4core 8thread E3-1270 or 1280. These ones have double the E3-1225 threads, have higher MHZ and lower TWP (80watts) since they do not have an integrated GPU.

Drawbacks and limitations of the Dell T1600 you should know

  • PSU's ( 265W or 320W) don't have a GPU power connector. So with standard PSU you're limited to PCI-E powered GPU's. Note also that the 320W PSU won't be enough for mid-range GPUs 
  • CPU fan connector, and case connectors are DELL proprietary. If you plan to change the default fans you'll need and an PWM 5 to 4 pin adapter, like this one here again the fans by default are quite enough.

What happened to my Dell T1600

I's alive and kicking! Handles full load for 2/3hours without throttling and with reasonable temperatures 62 Degrees Celcius full load (for this CPU and keep in mind it's on tight space). The CPU also handles high loads pretty well AND VERY SILENTLY! It has been always on, a true workhorse. I actually also started to play some games (new games not 90's graphic games) on it remotely and it's still very capable being the GPU the bottleneck.

Update 10-2020:

Due to powerline low bandwithd added an PCI-E wifi card, TP-LINK Archer T4E which speeded up by 2 (yes TWO double speed). Internet speed a lot faster and I can play with Parsec remotley at home even better due to low lag. 

Update 11-2021:

Swapped it ! Got an (offered) Lenovo m92p SFF and had to swap the Dell for it. This one is a newer generation and it's more compact. (downgrading on the GPU though).

Wednesday 7 October 2020

Python Static Code Analysis

Python static code analysis with Prospector and Bandit

Not going to talk about the "why should one use code analysis tools", if you read it up to the end you'll get it!

Which code analysis tools?

Let's talk about Code Analysis in Python, what to use, why to use, experience on using it.

Currently I use only 2, and for me it's the limit of code analysis tools to use at the same time without much overhead.  Prospector & Bandit. Why two?

Well one, Bandit,  focus specifically on security on your Python code, the other has a wider range focusing on potential errors, complexity and convention violations . Both overlap in some way, with Prospector replacing Pylint, pep8 and McCabe complexity, endoing: you'll get more than enough code analysis, sometime more than you can handle. (I'll get to that latter on)


How to Install Bandit and Prospector?

Installation is very strait forward on both of them.

Installing Bandit is as simple as:

pip install bandit
or 
pip3 install bandit 

Installing Prospector isn't much harder:

pip install prospector[with_everything]
or 
pip3 install prospector[with_everything]


Running of Bandit and Prospector?

First you need your python file. In this case I've used an example one just for the sake of example, let's call it tst.py


It's a very simple program with one function, user input and screen output. Let's run first Bandit, how? Simple:

    bandit tst.py

Here's the result:

Looks like we've got a potential issue with the "input" , since we're using python3 won't be a problem but lets assume that it is. Go to the link and read the explanation, so if we're on Python2 let's swap input() with raw_input() else it's all alright.

Now running prospector, the -s flag points the profiles used, from veryhigh to verylow, in here you can opt to choose, if you don't use the flag medium shall be used, for sake of example let's go for the veryhigh :

    prospector -s veryhigh tst.py


As you can see LOTS of warnings are issued in the veryhigh (30 vs 6 on the medium profile) so use the veryhigh and high with come caution because most of the warnings in veryhigh are related to syntax and indentation aspects (pep8).

So if you apply most of the changes/fix all the warnings how will the code look like? ( DO keep in mind that sometimes you can't actually apply all the changes due to legacy code/ code dependencies, and sometimes your editor my leave some spaces/tabs between the lines which will conflict with the "veryhigh" settings)

Now your code is a bit safer and cleaner. This was a simple and silly example, try to run it on your own scripts/programs and see the differences, again in prospector don't rush into the "veryhigh" profile.


Monday 23 December 2019

Speed up apt-get updates

How to speed up apt-get updates?

Apt is the package manager used on Ubuntu and Debian systems, it's been around for a while and it should be around for a lot more, yet it has a problem: it downloads only one package at a time thus making it slow sometimes, specially if you have tons of tinny packages to update.

The solution: apt-fast! Downloads packages in parallel making A LOT faster.

  • How to install
sudo add-apt-repository ppa:apt-fast/stable
sudo apt-get update
sudo apt-get -y install apt-fast
  • How to use it
sudo apt-fast update
sudo apt-fast upgrade
apt-fast
apt-fast installation


That's it!  


Obviously the more packages you're installing/upgrading the more you'll notice the difference.

Monday 24 June 2019

Lenovo X250 tweeking in linux

Why the Lenovo X250?

My needs: a daily driver laptop, very cheap, light, small, upgradable and serviceable. (want to swap hdd, thermal paste etc) and Linux friendly. All things considered, I came up with a bargain on eBay, a 12.5"  Lenovo ThinkPad X250, i5 5300U with 8gb RAM, 128gb SSD, 2 batteries and HD screen with a barely noticeable bruise (which shall be swapped latter) for 130Euro.

X250 condition

X250 keyboard and screen

The Lenovo X250 in 2019 It's preparation for linux daily driver.

The batteries, yep no typo --two batteries-- this model has 2, one internal the other external were ~82% capacity each, the screen bruise is somehow noticeable, the fan and thermals were alright, yet first things to do; swap thermal paste for a top of the line one and swap the 128gb SSD for one bigger a 256SSD.  Keep in mind that there's a whitelist of LCD screens, if not on the list no brightness control on windows.
So price tag till now:
  • X250 + Postage = 130Euro
  • Grizzly  Kryonaut = 5Euro
  • Western Digital Green SSD 256Gb = 33Euro
  • FHD IPS screen ref ( ref MTM 20CLS0XA03 20CL)  = 75Euro
  • Linux Mint19 = Free
X250 Interior

The thermal paste change settled the temperatures in full load (15min test) under 65 degrees, ( s-tui tool to monitor and stress CPU, sysbench to stress).

The i5-5300U CPU has a 'built in' GPU, the HD5500 and together both can consume up to 15w of power. When this power consumption threshold is exceeded the frequencies are lowered and the performance of the CPU, the GPU or both it takes a hit. The CPU/GPU throttling can also happen when the one of both achieves a certain temperature threshold, in the case of the X250 this doesn't happen due to good cooling. Even with default cooling/paste I could run stress tests at full CPU speed.

Undervolting Lenovo X250 and optimizing battery life


Next I decided to undervolt the CPU, this would allow even lower temperatures, more battery life and avoid package throttling, the 15watt limit! If both CPU and GPU consume less, less throttling will happen (duhh) and more performance one will get.
To undervolt I used undervolt python package, after a couple tests I could lower my voltages with the following values:

--core -100 --cache -100 --gpu -55 --uncore -70 --analogio -50
The values might get lower but I want full stability under all circumstances.

Hint: Don't just do stress tests, use the computer normally, and use it while doing the tests, I happen to pass lots of tests with -130mV in the core but crashed when opening firefox for example.

In order to test I installed sysbench and ran the following command:
sudo sysbench cpu --threads=4 --time=300 run
My results were the following, yet what matters is that the temperature didn't go above 63 degress Celcius.

CPU speed:
    events per second:  2675.87

General statistics:
    total time:                          300.0013s
    total number of events:              802769

Latency (ms):
         min:                                  1.09
         avg:                                  1.49
         max:                                 30.35
         95th percentile:                      1.52
         sum:                            1199489.59

Threads fairness:
    events (avg/stddev):           200692.2500/865.84
    execution time (avg/stddev):   299.8724/0.00

5 minutes after the test the temperatures drop to an very acceptable 37 degrees!

Battery life: depends a lot on what I do, compiling, watching youtube, browsing, screen brightness, but safe to say that at 50% screen brightness, light browsing 5 hours easily.

Now 2 important packages needed to be installed, these (basically) will tuneup the SO so it consumes a lot less energy, TLP will even make your fan be quieter in normal use: powertop and tlp

To install TLP:
$ sudo add-apt-repository ppa:linrunner/tlp
$ sudo apt-get update
$ sudo apt-get install tlp tlp-rdw 
$ sudo tlp start 
 
 
To install and configure powertop:
$ sudo apt-get update
$ sudo apt-get install powertop
$ sudo powertop --auto-tune 

On my lenovo X250 these steps gave me an extra 1h battery life and LOT quieter fan.

Thursday 30 May 2019

Honeypot deployment on Linux - OpenCanary

What’s a honeypot what what it’s purpose ?

It’s basically a computer or Virtual Machine emulating some services (ex: ssh, ftp, telnet, netbios, https, samba server etc) and accepting, logging and sending warnings of all incoming connections. You can use it as intrusion detection or early warning system but it also might go a little further and allow one to get inside the intruders ”head” since you get to log every interaction.

How and where should it be placed?

Let’s start with “where”. I usually place them in specific areas to get an idea how/or if the network is tested from outside or inside. So I have about three major areas; behind firewalls, in “sensible zones” where only pre-defined machines should have access and in the “public zone” such as administrative/general network.

Placing a honeypot behind firewalls/”sensible zones” will ensure that the firewall is doing it’s and if you get a hit that means you have a miss-configurations or a serious intrusion. Honeypots placed in the “public zone” will give you a glimpse if you have some outsider skimming your network, an inside threat or just a very network-enthusiastic co-worker… to put it mildly.

How to place it? This answer can be split in two parts, hardware and timeline.
  • Since the minimum hardware requirements are very low Virtual Machines are the best option. 1 vCPU and 512 RAM will be enough for each instance.
  • Timeline; If you have the resources (basically mature security team with proper tools) then all of them at the same time. If not, deploying the honeypots from the most to the least secure zones in the network is recommended. In the most secure zone you should have no events at all where as in the least you might get a couple, his approach will give some time to understand eventual breaches and mature responses. (opposite to having lots of hits all across the network and spreading resources in order to understand what’s happening)

Which software and how to install it?

A very simple honeypot is opencanary. It’s freeware, it emulates windows/linux server, as well as mysqlServer, ftp, ssh, I can generate events to syslog files, log file and via email. Usually I ran it on an Ubuntu Server with 1vCpu and 512ram.

  • Install Ubuntu server version and make all the security updates
  • Install necessary libs and the honeypot
$ sudo apt-get install python-dev python-pip python-virtualenv
$ virtualenv env/
$ . env/bin/activate
$ pip install opencanary
$ sudo apt-get install -y build-essential libssl-dev libffi-dev python-dev
$ pip install rdpy
  • Finally run it for the first time (default configuration)
. env/bin/activate
$ opencanaryd --copyconfig
$ opencanaryd --start

Edit the file /.opencanary.confand set the this line "http.enabled":true and restart the service with the command: opencanaryd --restart This will enable the http server. Now point your browser to http://your-ip-addr and check your brand new Synology RackStation!

Try your luck by logging In with some commonly used user/passwords. Now check some opencanary logs in the file /var/tmp/opencanary.log


Your webserver fake page


OpenCanary Log file


Pretty interesting humm? Timestamp, user/pass tries, ip addresses…

Edit the configuration!


Now let’s create some services so the honeypot gets really sweet. Edit the configuration file /.opencanary.conf


{
"device.node_id": "HoneyPot-ServerName-Good-idea-to-change-it",
"git.enabled": false,
"git.port" : 9418,
"ftp.enabled": true,
"ftp.port": 21,
"ftp.banner": "FTP server ready",
"http.banner": "Apache/2.2.22 (Ubuntu)",
"http.enabled": true,
"http.port": 80,
"http.skin": "nasLogin",
"http.skin.list": [
{
"desc": "Plain HTML Login",
"name": "basicLogin"
},
{
"desc": "Synology NAS Login",
"name": "nasLogin"
}
],
"httpproxy.enabled" : false,
"httpproxy.port": 8080,
"httpproxy.skin": "squid",
"httproxy.skin.list": [
{
"desc": "Squid",
"name": "squid"
},
{
"desc": "Microsoft ISA Server Web Proxy",
"name": "ms-isa"
}
],
"logger": {
"class": "PyLogger",
"kwargs": {
"formatters": {
"plain": {
"format": "%(message)s"
}
},
"handlers": {
"console": {
"class": "logging.StreamHandler",
"stream": "ext://sys.stdout"
},
"file": {
"class": "logging.FileHandler",
"filename": "/var/tmp/opencanary.log"
}
}
}
},
"portscan.enabled": false,
"portscan.logfile":"/var/log/kern.log",
"portscan.synrate": 5,
"portscan.nmaposrate": 5,
"portscan.lorate": 3,
"smb.auditfile": "/var/log/samba-audit.log",
"smb.enabled": false,
"mysql.enabled": false,
"mysql.port": 3306,
"mysql.banner": "5.5.43-0ubuntu0.14.04.1",
"ssh.enabled": true,
"ssh.port": 22,
"ssh.version": "SSH-2.0-OpenSSH_5.1p1 Debian-4",
"redis.enabled": false,
"redis.port": 6379,
"rdp.enabled": false,
"rdp.port": 3389,
"sip.enabled": false,
"sip.port": 5060,
"snmp.enabled": false,
"snmp.port": 161,
"ntp.enabled": false,
"ntp.port": "123",
"tftp.enabled": false,
"tftp.port": 69,
"tcpbanner.maxnum":10,
"tcpbanner.enabled": false,
"tcpbanner_1.enabled": false,
"tcpbanner_1.port": 8001,
"tcpbanner_1.datareceivedbanner": "",
"tcpbanner_1.initbanner": "",
"tcpbanner_1.alertstring.enabled": false,
"tcpbanner_1.alertstring": "",
"tcpbanner_1.keep_alive.enabled": false,
"tcpbanner_1.keep_alive_secret": "",
"tcpbanner_1.keep_alive_probes": 11,
"tcpbanner_1.keep_alive_interval":300,
"tcpbanner_1.keep_alive_idle": 300,
"telnet.enabled": true,
"telnet.port": "23",
"telnet.banner": "",
"telnet.honeycreds": [
{
"username": "admin",
"password": "$pbkdf2-sha512$19000$bG1NaY3xvjdGyBlj7N37Xw$dGrmBqqWa1okTCpN3QEmeo9j5DuV2u1EuVFD8Di0GxNiM64To5O/Y66f7UASvnQr8.LCzqTm6awC8Kj/aGKvwA"
},
{
"username": "admin",
"password": "admin1"
}
],
"mssql.enabled": false,
"mssql.version": "2012",
"mssql.port":1433,
"vnc.enabled": false,
"vnc.port":5000
}